Make a Potted Plant Necklace
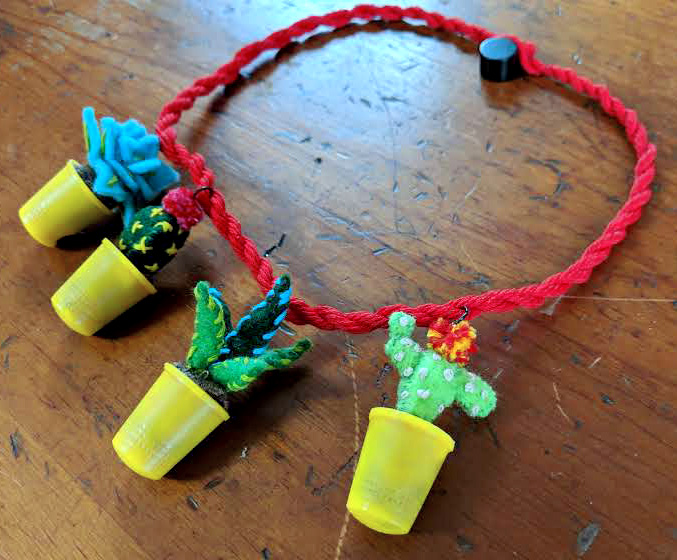
Inspired by the 1939 Flower Pot Necklace, this cute potted plant necklace is easy to make and requires only a few materials and simple hand sewing.
Let's Get Started!

About 7 yards of yarn for the necklace cord (I used red)
Felt in a variety of shades of green and blue (Dark, medium and light green and aqua)
Embroidery thread in a variety of colors (I used tan, blue, green and yellow for the plant details and red, pink and yellow for the cactus flowers.)
Brown cloth or felt
4 thimbles (I used plastic, but metal could also be used.)
1 ball button
Thread to match the cord and felt colors
PVA craft glue (NOTE: if using plastic thimbles, stay away cyanoacrylate glues like super glue which can melt the plastic.)

Making the necklace cord:

Step 1: Cut 7 - 10 strands of embroidery thread, depending on the thickness of the cord desired. (I used 7 strands for my necklace.) The length should be twice the finished length, plus about 10 inches. Knot the strands together at both ends.

Step 2: Get someone to hold one end, while you hold the other, stretch the yarn taut and twist it by inserting a pencil through the yarn at one end and rotating it in one direction.

Step 3: When it is tightly twisted, fold the length in two, holding it firmly so it won’t unwind. Now let go of one end and it should twist up, creating the cord.

Step 4: Turn back the knotted ends 1/2 inch and conceal the knots with embroidery thread by coiling it around the knots and tying in place. Sew the ball button to the end.

Step 5: On the loop end, wrap and tie a bit of thread around the cord, about a 1/2” from the end to secure the loop.

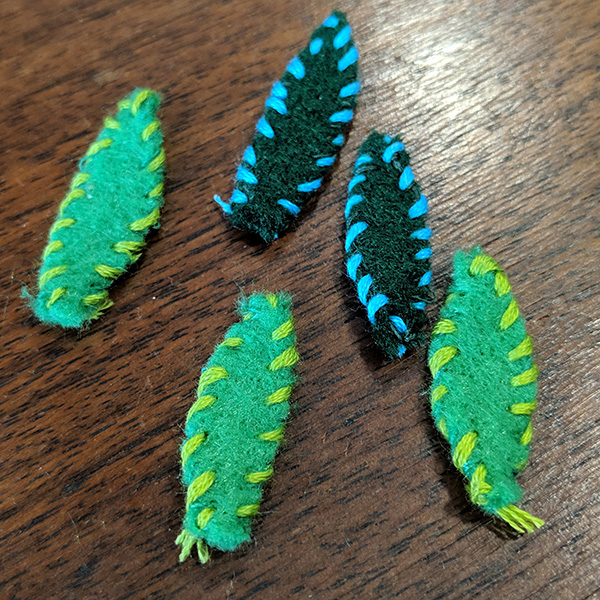
Cactus Style 1

Step 1: Using the pattern provided, cut two each of pieces 1, 2, 3 and 4 out of light green felt.

Step 2: Before sewing felt pieces together, sew little “thorns” on each piece with tan embroidery thread, using a french knot embroidery stitch.

Step 3: Using matching thread, sew matching pieces together with a whip stitch, leaving the bottoms open.
Step 4: Sew pieces to each other to form the cactus.

Step 5: Take a piece of 3” length of wire, bend in half and twist together. Stuff cactus with small bits of felt to add volume. Sew the bottom closed, tightly around the wire, to keep it in place.

Step 6: With yellow and red embroidery thread, make a miniature pompom. (Directions at the bottom of the page.) Sew pompom to the top of the cactus.

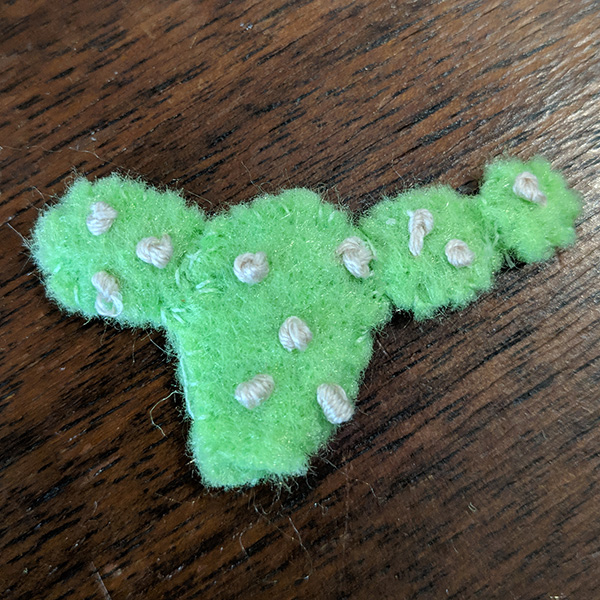
Cactus Style 2

Step 1: Using the pattern provided, cut one each of pieces 5, 6, and 7 from dark green felt.
Step 2: For the cactus thorns embroider three small x’s down the center of each piece, using yellow embroidery thread.

Step 3: Sew the right edge of piece 5 to the left edge of piece 6 with a whip stitch. Sew the right edge of piece 6 to the left edge of piece 7 and the right edge of piece 7 to the left edge of piece 8 to close up the cactus.

Step 4: Embroider three small x-s along each of the three stitched edges, to finish off the cactus thorns.

Step 5: As you did with Cactus Style 1, bend the wire and insert it in through the bottom. Sew bottom shut to secure the wire.

Step 6: With pink and red embroidery thread, make a miniature pompom, as you did with Cactus Style 1.

Plant Style 1

Step 1: Using the pattern provided, cut one each of pieces 8, 9, 10 and 11 out of aqua blue felt.

Step 2: Coil piece 8 and stitch along the edge to secure.
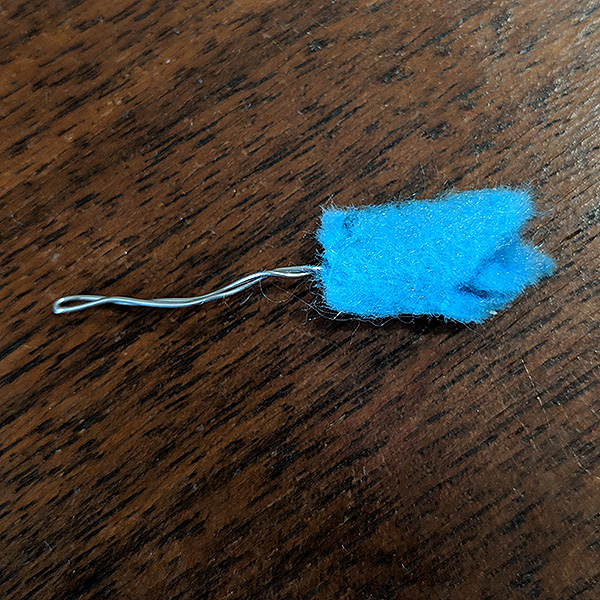
Step 3: Insert a wire through the top of the coil until the end is hidden inside the coil. Stitch the bottom to secure the wire.

Step 4: On pieces 9, 10 and 11, stitch a line down the center of each leaf using a backstitch.

Step 5: Slide piece 9 onto the wire below the coil and add stitches to attach piece 9 to the coil.

Step 6: Add a few stitches to the clipped corners, between the leaves, to help shape the plant.

Step 7: Continue to add pieces 10 and 11, stitching between each one to attach the layers. Stitch the clipped corners to shape, as in Step 6.

Step 8: Stitch a French knot in the center of the coil and then stitch down through.

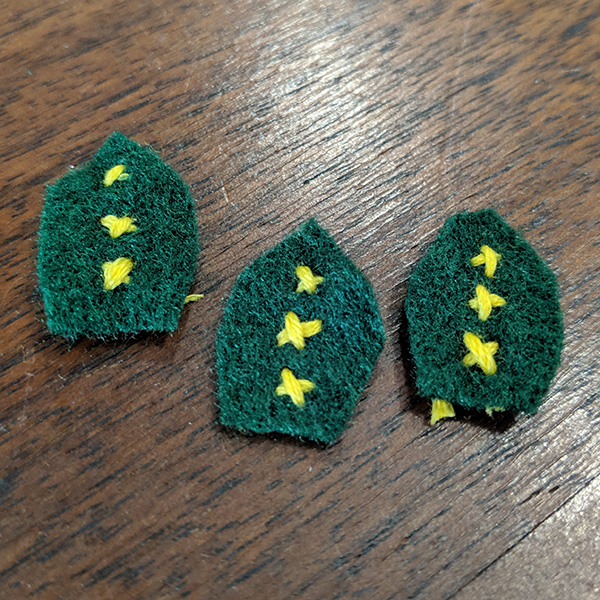
Plant Style 2

Step 1: Using the pattern provided, cut 2 each of pieces 12, 13, 14, 15, 16. Cut pieces 12 and 14 from dark green felt and the rest from medium green felt.

Step 2: Sew matching pieces together with a whip stitch, leaving the bottoms open.
Step 3: With blue embroidery thread sew the edges of pieces 12 and 14, using a whip stitch. Use light green embroidery thread to sew the edges of pieces 13, 15 and 16.

Step 4: Insert wire into the bottom of each leaf and sew up to secure the wire.

Step 5: Gather all 5 of the leaves and twist the wires together to form the plant. Use the wires inside the leaves to adjust their position.

Miniature Pompoms

Step 1: Wrap two colors of embroidery thread, about 20 times, around 3 tines of a regular dinner fork. (The more you wrap the yarn, the fuller the pom-pom.)

Step 2: With a matching piece of embroidery thread, tie the bundle together between 2nd and 3rd fork tine. Tie this as tightly as you can.
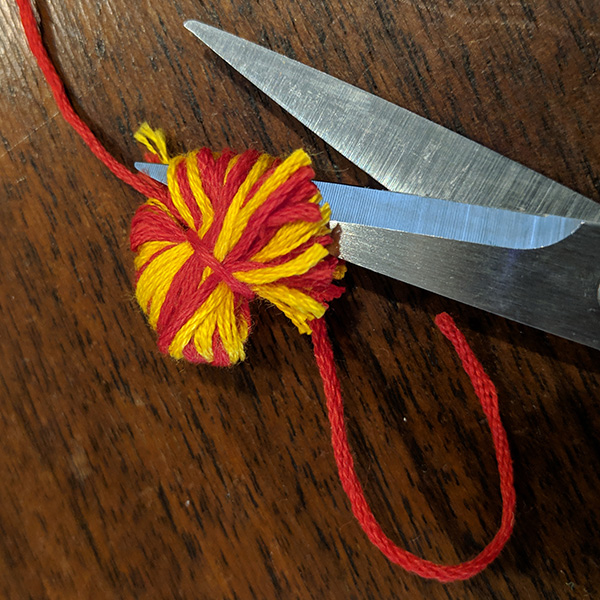
Step 3: Slip the bundle from the end of the fork and snip through all the loops of yarn.

Step 4: Trim the pompom so that it is even on all sides and is the size you want. Fluff the pompom with your fingers to shape.

Finishing off the Necklace

Step 1: From brown fabric or felt, cut four squares about 1.5 x 1.5 inches. Cut a small slit in the center of each one and insert the wire of the plants. From the underside, sew the brown fabric square to the plant.
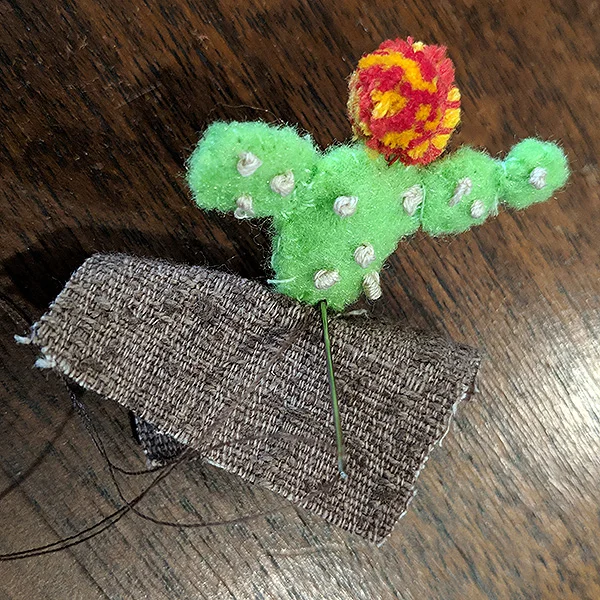
Step 2: Add a few small stitches on the top side to further secure the plant to the “dirt”.

Step 3: Gather corners of the fabric square together to form a little package and add some stitches to keep everything together.
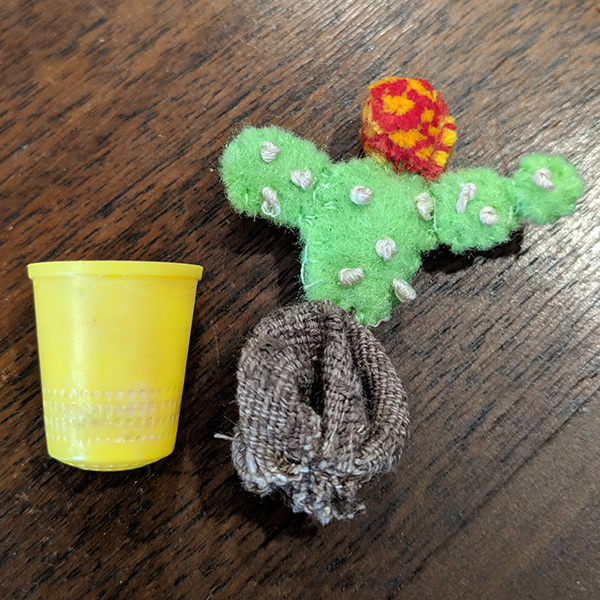
Step 4: Add a bit of glue to the insides of the thimbles and insert the plants into the thimble. Let the glue dry.

Step 5: Sew metal jump rings to the top of each plant and attach the plants to the cord. If you find the jump rings slide down the cord too much, secure by tying the rings to the cord with a bit of thread.