Sewing a Vintage Girl's Dress
I have been collecting vintage sewing patterns for quite a few years. I can't resist the fabulous illustrations on the fronts and the wonderful styles. My collection contains patterns mainly from the 1940s through the 1960s, but I have some as far back as the late 1800s. I've always planned to sew something from one of these patterns but never have. I consider myself an intermediate sewist and have sewn a number of modern and retro patterns, but the thought of diving into a true vintage pattern always scares me a bit.
I really wanted to sew a dress for my 4 year old niece, so decided it would be the perfect opportunity to officially break out one of those wonderful vintage patterns and give it a spin. I chose Simplicity 3806, from the early 1960s. I chose the pattern because it looked fairly simple, but at the same time had some special features like tucks in the bodice and skirt. To prepare, I read the instructions over and over again to make sure I understood what I would be doing by the time I actually started.
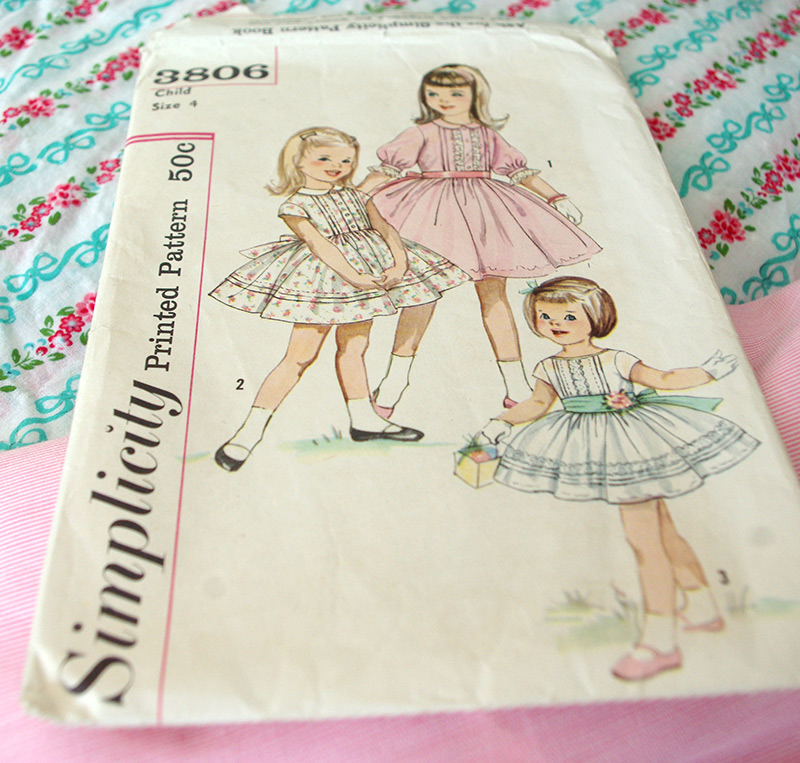
Vintage Simplicity pattern 3806
I originally planned to make this dress using vintage fabric from my stash, but didn't have anything that was quite right. So I decided to use some vintage look, modern fabric from Gertie Fabrics. The fabric is a cotton swiss dot with stripes of aqua bows and pink flowers. I thought it was perfect for a little girl's dress. I also wanted to make the sash with contrasting fabric and decided on some light pink vintage fabric that I had.
Cutting out the pattern pieces. The pink fabric is vintage and the patterned is modern fabric by "Gertie Fabrics".
The patterned fabric is rather thin, so I needed to interline it with another layer of fabric. I decided on plain white cotton muslin. This meant I needed to cut each part of the dress twice. Cutting and prepping the fabric is my least favorite part of sewing so I wasn't thrilled about this, but fortunately the pieces were small so the process didn't take as long as I feared. Once I had the outer and inner pieces cut, I layered them and basted the pieces together. I placed all my tailor marks on the inner fabric, which made them easier to see and didn't damage the outer fabric in any way.
Close up of the lining and tailor marks.
The bodice of the dress came together quite easily and quickly which surprised me, as there were a number of steps I haven't done before. For the most part I found the instructions of this vintage pattern to be similar to modern patterns. The only difference was, while modern patterns will give you step-by-step instructions for even the smallest step, vintage patterns assume that the sewist already knows what they were doing. As a result, I had to figure out some of the steps on my own. Fortunately, I've sewn a few things over the past few years and have learned some new sewing methods, which really helped me figure out what I needed to do. My collection of vintage sewing books and the internet helped as well.

The finished bodice with cap sleeves and peter pan collar.
Some of the newer things I learned with this pattern were sewing in a collar and making tucks. The collar was bit finicky for me, partly because I had never done one before and partly because of the small size. The tucks were much easier for me to figure out. The directions called for tucks in both the bodice of the dress and in the skirt. The bodice tucks were pretty easy, but the skirt tucks took a long time to get right and to keep even and straight. I was happy with the way they came out, especially for my first time.
A close-up of the bodice and the tucks.
Originally the sash of the dress was intended to be sewn into the dress. I decided to keep the sash separate from the dress so that it could be removable. To finish the dress, I added a row of small, pink heart shaped buttons to the front of the bodice for decoration. My niece doesn't like buttons for some reason (Hey, she's four!), so I was going to try to modify the pattern to include a zipper for the back closure, but I didn't have the knowledge or time to figure out how to do that. As she is a fan of both pink and sparkles, I chose some pink, sparkly buttons for the back, to make the fact of the buttons a bit more palatable for her. The button hole function on my sewing machine didn't work properly for some reason, so I had to hand sew the button holes. I've never done this before, so they weren't the most beautiful but are being covered by the buttons and are functional. Overall the dress took 2 and a half days from start to finish, which I consider pretty fast considering much of the finish work was all hand sewn.
I'm pretty happy with the way it came out and more importantly, despite the presence of buttons, my niece is too. I sewed a size four dress, which turned out to be a bit large on her, but the sash helps to tighten it a bit and she'll be able to wear it for a while.
The finished dress.
Testing the dress' twirling ability. It works!